
8mm sound PROJECTIONIST'S HELP SHEET
8mm projection can be difficult to perform well due to
the very small size of the film and manufacturer's very ideosyncratic sound projector
designs that inhibit easy manual threading and necessary cleaning of the
gate and soundhead.
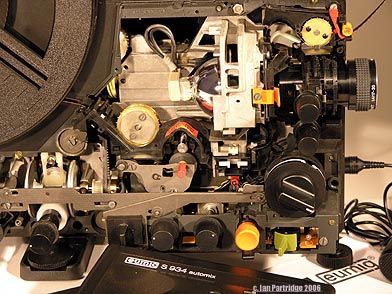 Eumig S934 showing auto-threading path for picture and sound.
8mm and Super 8mm guages, being smaller, demand clean and dust
free projection because the least particles of dust or hairs in the gate are
magnified more than with the larger film formats. Unfortunately most 8mm projectors
do not have a 'swing-out' gate for cleaning as do 16mm projectors.
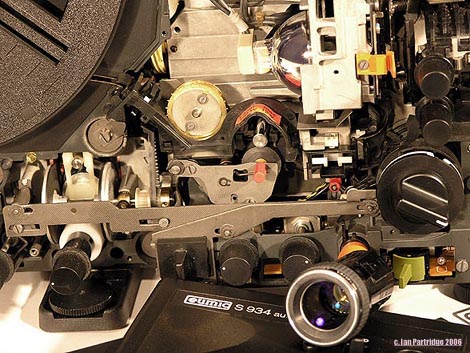 Eumig S934 with lens removed -
Where easy access is not provided to the gate and sound heads for
cleaning, dust and emulsion debris can rapidly build up and obscure the picture and
deaden the sound. With the lens carefully removed on this Eumig S934 projector,
a brush can be introduced directly through the empty lens port to more effectively
dust the gate. Sound head cleaning on the S934 involves an essential tool, a red
plastic nut driver that allows unlocking and removal of the sound pressure pad for cleaning.
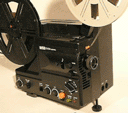
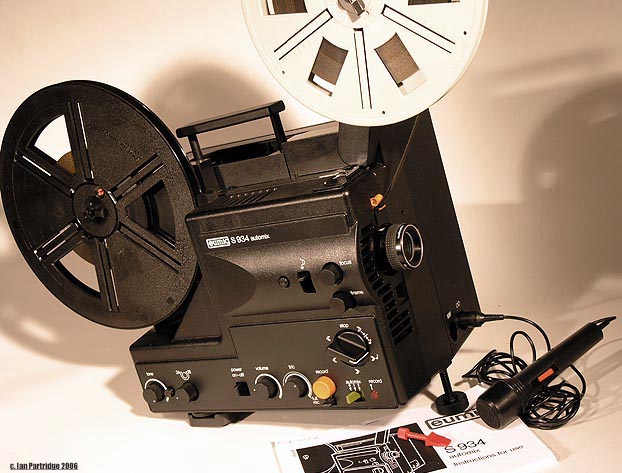 Eumig S934 Super 8mm Sound Projector
8mm sound PROJECTIONIST'S HELP SHEET
Tools:
A soft camel hair brush to clean the film 'gate' of loose dust, hairs and emulsion before threading the reel. The brush is also used to
remove fluff or dust from the magnetic sound head below the gate. Brush the gate and sound head as a matter of routine before threading each reel.
An orangewood stick, is necessary to remove encrusted emulsion build-up from the gate, gum, ferrous sound stripe, and bits of old tape
splices. These show as hard dark blobs on the gate and pressure pad. The wood can be used to gently remove them without scratching the gate or pressure pad. The wood can be shaped from the sharpened end of the camel hair brush.Access to the gate may be restricted on your Super-8mm projector. The lens may be removed to brush the gate via the empty lens port.
A Selvyts or lens cleaning cloth for use when checking the film. The cloth is held between finger and thumb and the film passes through while being examined for bad splices, tears to the perforations while film is wound onto the empty spool
A good 400' ft. 'Auto' open sided take-up spool. - Only choose
a larger 600' ft. or 800' ft. take-up spool if you need to. Larger
spool sizes are more awkward threading as fingers cannot squeeze
between the narrow spool flanges to pick up the loose end of the film. Choose a spool that
you know is perfect and does not pinch or snag the film. A take-up
spool should be undistorted and the flanges flat, otherwise the film may snatch
suddenly on spool sides that may have been squeezed and squashed.
A bad spool can cause the film to break.Tape splicer, spare spools, film leader, scissors, clear sellotape, felt tip pens, paper and card, 'gaffers' tape, extension cord,
electrical screwdriver, phillips crosshead screwdriver, fuses, spare projection lamp, a table lamp or torch.All of the above are necessary equipment to have available to ensure any interruptions will be brief.
8mm Projectors
Rewind Clutch (Always run motor forwards before threading)
Run the projector forwards for a brief time before threading film. The rewind clutch will become disengaged by running forwards. If
you thread up and start with the rewind clutch engaged, then the rear take up spindle will viciously pull the film and a break will
occur between the last roller and the take up.
Rewinding film and Inspecting film before projection
It is worth the extra effort to inspect the print for bad joins, fluff and dust before showing.
Each film reel is wound forward onto an empty reel and then back with a clean Selvyts cloth held lightly with the film passing between finger and thumb. You can feel every join passing through and inspect it. At the same time any stray hairs or dirt will be picked up by the cloth. Any bad join or damaged perforations can
easily be felt going through.To fast rewind, a clutch button is pushed down with the motor in reverse, and the take-up spindle will spin faster. (Always remember
to disengage rewind clutch by running motor forwards before
threading).
Auto-thread
The auto-threading system found on Super-8mm projectors.
Auto-thread loop-forming additions to the film path are a hindrance because it often becomes necessary to access the film path and attend to a problem. Auto-thread projectors are less easy to thread manually on occasions when hand threading is necessary in the middle of a reel.
Often the leader threads and runs perfectly only to lose the loop from a bad splice at the beginning of the opening scene. This is
because the leaders have been carelessly
attached.Practice removing the film carefully from the film path and carefully rethreading without damage to the film.
Some Comments:
A spool of film is correctly wound, if you pull down the first few feet of leader to the beginning: the picture should be upside down
and (any words) mirror reversed with the soundtrack at the left side and the perforations at right.When threading, the claw of the intermittent and the perforations are on the outside, while the soundtrack, soundhead are on the inside.
The full take-off reel will rotate slowly at first with the empty reel rotating fast. During the middle the speed of the two spools is equal and fairly slow. As the take-up spool becomes fuller and slower, it also becomes heavier. Sometimes the full reel will stop rotating, with the film slowly emptyingitself onto the floor.
When this happens, it is possible to start up the take-up spool again (holding it back constantly) and spool-up the spillage
without stopping the show. The secret is to leave the spilled film untouched as it came off the reel and it will always wind back onto
the take-up without tangling. Once the spill is taken up, the take- up spool can be turned with a pencil stub.
Reserve a chair on the operating side of the projector. When a film is very popular every single chair in the hall will be grabbed by the audience and you do need to sit minding the
projector for focus, volume, and tone levels at all times.Start the projector running with the volume turned off. Listen to the sound of film chuntering through the projector and if it
'sounds right' then switch on the lamp.Hold your hand before the lens while the 'academy' leader runs through projected on your hand. Remove your hand at the start of
the first scene. This avoids the audience seeing numbers flashing on the screen. Turn up the volume. Adjust the rack for framing if
necessary, and focus last.Don't rewind film during the performance. It is very distracting to the audience
Never stop the projector suddenly without first running with the lamp turned off. This allows the cooling fan to cool the lamp, and extends the life of the lamp. It is switching lamps on and off that most reduces bulb life. The filament in the lamp should not be subjected to vibrations and shocks when lit. It may cause an unnecessary burn out.
__________________________________________________________Hi Ian,
I have just purchased one of these machines my eleven year old son has got me interested due to his fascination with super 8 . I have successfully put a film on correctly but I find it won't wind onto the empty reel when in the feeder clamp bit as I don't want to tear or scratch the film on the tiny perforation teeth sprocket any suggestions would be great.
Kind regards,
Neil
_______________________________________________________________________________
Hello Neil,
For Super-8mm projectors details will vary with each make or model of your projector.
However:Without film threaded and without spools. Check the rewind clutch by setting
control knob to REVERSE/REWIND - The front spool spindle should rotate at a
rapid speed.Set the control to OFF, then briefly to RUN, then OFF. This will disengage
the rewind clutch.Set the control to RUN and observe the back take-up spool spindle. Does it
rotate? (If not, may indicate perished or broken or misplaced take-up belt).If running OK, then fit empty SP8 take-up spool. Does the take -up spool
rotate? (If not, then the plastic splines on the spindle centre are broken -
a very common fault - and the spool is slipping. Apply a suitable folded
paper wedge to correct, and use an 'auto-thread' spool if available.Next, try threading with film. The film white leader end must be clipped to
a thumbnail shape with the appropriate trimmer for your model projector
(almost always lost!) Pruning the end with nail scissors is a substitute and
remember to impart a slight downward curve to the end you have trimmed to
smooth the threading.With sound projectors threading is always when the sound heads are raised.
Usually the first forward setting on your projector.If you need to remove the film from the film path while it remains threaded:
this is extremely fiddly and tricky as it will involve removing the side
cover, unclippng the gate pressure shoe and sprocket guides and carefully
extricating the film from the film path. This varies in difficulty with each
model projector.Before projecting a film it is worth checking for bad splices and torn
perforations which can be the cause of problems running the film. You can
wind on the film manually from front to back spool using examining for torn
perforations by feel, lightly touching the film between forefinger and thumb
and by eye.I hope this information is helpful.
Best regards,
Ian
16mm PROJECTIONIST'S HELP SHEET
About | Privacy/Terms | Contact | FAQ
www.ian-partridge.com ~ Web page content photography and design ~ Copyright © 2019 2024 Ian Partridge.